Canon printers are renowned for their quality and efficiency, and connecting them to Wi-Fi can streamline your printing process, allowing for seamless printing from multiple devices. Whether you have a Canon PIXMA, MAXIFY, or imageCLASS printer, the steps for connecting to Wi-Fi are generally similar. Here’s a step-by-step guide to get your Canon printer connected to your Wi-Fi network.
Step 1: Prepare Your Printer
Before you start the connection process, ensure that your Canon printer is powered on and properly set up. Make sure there are no error messages on the printer’s display panel and that it is in a ready state for configuration.
Step 2: Access the Printer’s Network Settings
Using the printer’s control panel, navigate to the settings menu. The exact steps may vary depending on your printer model, but typically you can access the settings by pressing the “Menu” or “Settings” button on the control panel.
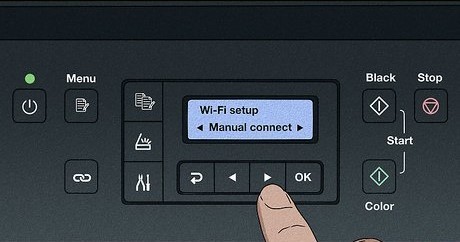
Step 3: Select Wi-Fi Setup
Within the settings menu, locate the option for Wi-Fi setup or network setup. Again, the wording may differ slightly depending on your printer model. Once you find the Wi-Fi setup option, select it to begin the process of connecting your printer to your Wi-Fi network.
Step 4: Choose Your Wi-Fi Network
Your printer will search for available Wi-Fi networks in the vicinity. When the list of networks appears on the printer’s display panel, select your Wi-Fi network from the list. If your network does not appear, ensure that your printer is within range of your Wi-Fi router and that the router is operational.
Step 5: Enter Wi-Fi Password
After selecting your Wi-Fi network, you will be prompted to enter the password for the network. This is the same password you use to connect other devices to your Wi-Fi network. Use the printer’s control panel or keypad to input the password.
Step 6: Complete the Connection
Once you have entered the correct password, the printer will attempt to connect to your Wi-Fi network. This process may take a minute or two. If the connection is successful, you will see a confirmation message on the printer’s display panel.
Step 7: Test the Connection
To ensure that the connection was successful, try printing a test page from your computer or mobile device. If the test page prints successfully, congratulations! Your Canon printer is now connected to your Wi-Fi network and ready for wireless printing.
Conclusion
Connecting your Canon printer to Wi-Fi opens up a world of convenience, allowing you to print from anywhere within your Wi-Fi network range without the need for cumbersome cables. By following the simple steps outlined above, you can quickly and easily connect your Canon printer to your Wi-Fi network, enabling seamless printing from your computer, smartphone, or tablet. Enjoy the freedom and flexibility of wireless printing with your Canon printer.