How to Print Screen on Chromebook: A Step-by-Step Guide
Printing screen or taking screenshots on a Chromebook is a useful feature for capturing moments, saving information, or troubleshooting technical issues. Whether you want to capture a webpage, an error message, or a funny meme, learning how to print screen on your Chromebook is simple and straightforward. In this article, we’ll walk you through the various methods to take screenshots on a Chromebook.
Method 1: Using Keyboard Shortcuts
Chromebooks offer keyboard shortcuts that make it easy to capture screenshots without any additional software. Here’s how to do it:
1. Capture the Entire Screen:
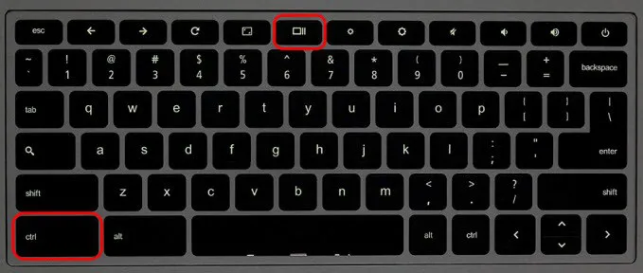
- Press the Ctrl + Show windows keys simultaneously. The “Show windows” key is typically located in the top row, next to the brightness and volume keys.
- Your screen will dim for a moment, indicating that the screenshot has been captured.
- The screenshot will be saved in the “Downloads” folder by default.
2. Capture a Specific Area:
- Press the Ctrl + Shift + Show windows keys simultaneously.
- Your cursor will change to a crosshair.
- Click and drag to select the area of the screen you want to capture.
- Release the mouse button to take the screenshot.
- The screenshot will be saved in the “Downloads” folder.
Method 2: Using the Screenshot Tool
Chromebooks also have a built-in screenshot tool that allows you to capture, edit, and save screenshots directly. Here’s how to use it:
1. Open the Screenshot Tool:
- Press the Search + Shift + S keys simultaneously. The “Search” key typically has a magnifying glass icon and is located next to the Ctrl key.
- Alternatively, you can click on the clock in the bottom right corner of the screen, then click on the “Screenshot” icon.
2. Capture the Screen:
- After opening the screenshot tool, your screen will dim, and a toolbar will appear at the bottom of the screen.
- Click and drag to select the area of the screen you want to capture.
- Release the mouse button to take the screenshot.
- The screenshot will be saved in the “Downloads” folder.
3. Edit and Save the Screenshot:
- Once the screenshot is captured, you can use the toolbar at the bottom of the screen to annotate, crop, or save the screenshot.
- Click on the “Done” button to save the screenshot to the “Downloads” folder.
Method 3: Using External Keyboards
If you’re using an external keyboard with your Chromebook, the keyboard shortcuts for taking screenshots may differ slightly. Refer to your keyboard’s manual or try the following shortcuts:
- Capture Entire Screen: Ctrl + F5
- Capture Specific Area: Ctrl + Shift + F5
Conclusion
Taking screenshots on a Chromebook is a simple process that can be done using keyboard shortcuts or the built-in screenshot tool. Whether you need to capture the entire screen or a specific area, Chromebooks offer convenient options for capturing and saving screenshots. By mastering these methods, you can easily capture and share important information, memorable moments, or anything else you want to preserve digitally.