Capturing Screenshots on an HP Laptop: A Step-by-Step Guide
Capturing screenshots on an HP laptop is a straightforward process that allows users to capture images of their screens for various purposes, such as saving important information, sharing content, or troubleshooting technical issues. Whether you’re using a Windows or macOS HP laptop, there are simple methods to capture screenshots efficiently. In this guide, we’ll walk you through the steps for both operating systems, providing easy-to-follow instructions.
Capturing Screenshots on Windows HP Laptops:
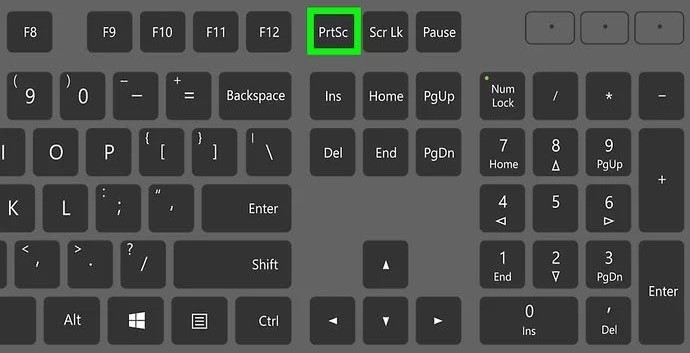
Method 1: Using the Print Screen Key (PrtScn)
- Full Screen Capture: Press the “PrtScn” key on your keyboard. This captures the entire screen.
- Capture Active Window: To capture only the active window, press “Alt” + “PrtScn” simultaneously.
- Saving the Screenshot: After capturing the screenshot, open an image editing software like Paint or Photoshop, and paste the screenshot using “Ctrl” + “V”. Then, save the image.
Method 2: Using the Snipping Tool (Windows 7) or Snip & Sketch (Windows 10)
- Open the Snipping Tool or Snip & Sketch: Search for “Snipping Tool” or “Snip & Sketch” in the Windows search bar and open the respective application.
- Capture the Screenshot: Click on “New” in the Snipping Tool or “New Snip” in Snip & Sketch. Then, select the area of the screen you want to capture.
- Save the Screenshot: After capturing the screenshot, you can annotate it if needed and save it to your desired location.
Capturing Screenshots on macOS HP Laptops:
Method 1: Using Keyboard Shortcuts
- Capture the Entire Screen: Press “Command” + “Shift” + “3” simultaneously. The screenshot will be saved as a file on your desktop.
- Capture a Selected Portion of the Screen: Press “Command” + “Shift” + “4”, then drag to select the portion of the screen you want to capture. Release the mouse button to capture.
- Capture a Specific Window: Press “Command” + “Shift” + “4”, then press the spacebar. Your cursor will change to a camera icon. Click on the window you want to capture.
Method 2: Using Grab Utility
- Open Grab: Go to “Applications” > “Utilities” > “Grab”.
- Capture the Screenshot: In the Grab menu, select “Capture” and then choose from “Selection,” “Window,” “Screen,” or “Timed Screen” to capture the desired screenshot.
- Save the Screenshot: After capturing the screenshot, you can save it by selecting “File” > “Save” and choosing the desired format and location.
Conclusion:
Capturing screenshots on an HP laptop, whether running Windows or macOS, is an essential skill for users to quickly capture and share information. By following the simple methods outlined in this guide, users can efficiently capture screenshots of their screens, whether it be the entire screen, a specific window, or a selected portion. Whether using built-in keyboard shortcuts or dedicated applications like the Snipping Tool or Grab utility, HP laptop users have a variety of options to choose from based on their preferences and needs. Mastering these techniques can greatly enhance productivity and facilitate effective communication in various personal and professional scenarios.